Tuesday, October 30, 2012

Training – POV – The “tape” doesn’t lie!


Good news, bad news about a head-mounted POV camera.

Good news: You can see exactly what you are doing – right and wrong.

Bad News: You can see exactly what you are doing – right and wrong.

My first live range experiment was at our final steel shoot of the year. Great day, sunny, warm and the 2nd day of Pheasant season. Result – 6 shooters. Heavy sigh. Rick said he didn’t want to shoot so for the first time this year I got to shoot the whole time – 2 hours. Very nice.

A couple things about our steel shoots. We only have 2 lanes to set up in. We don’t do the 5-rounds through each station and throw out the worst case, we just shoot either lane as much as we want. We do keep times and I post the lowest time for each shoot.

We also have smaller targets for our shoots – 8-inch rounds and 8x10 rectangles. And, we use only 4ft stands. Our intent was to just introduce our members to steel. Honestly, it’s been a great success with 20 shooters or so showing up twice a month. Great fun!

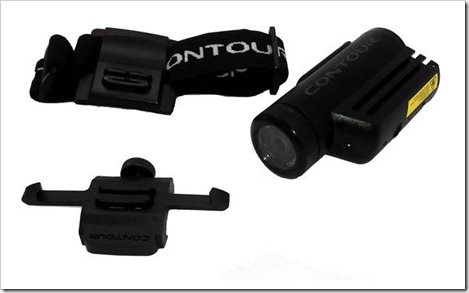
So, it was a great chance to try the Contour ROAM a bit more. I filmed all my rounds but I have selected 3 to chat about.

First – I run dry. Heavy sigh. 10 rounds, still not able to clean the plates. Why even show this? Well, it’s good to stay grounded. Everyone sucks at these things – perhaps more often than we care to admit. Second and Third - they let me watch myself “over my shoulder”. It lets me see what I do when it goes fairly smooth and when I can’t hit a darn thing. In other words, it’s a great learning tool and I’m learning to like it.

My first run was the one I ran dry on. Let’s see – mmmmmm – excuses; first run, I wasn’t “ready”. I was nervous because I was on camera. I haven’t shot much this year. . . . . and on it goes. Actually, my first round sucked – head wasn’t in the game, hurried shots and I became frustrated with my misses. Sadly, it’s all there to see . . . . enjoy!


Shoot it dry!

The next run up for your consideration – I cleaned the plates, emptied the gun to do it – all 10 rounds. Heavy sigh. The purpose for this video is to show the importance of follow through. You need to keep your weapon on the “threat” (plate) until it’s down (or you hear the “Ping”). You will notice that I get antsy and move off the plate and then I have to come back, reacquire and send another round down range. Heavy sigh. Follow through . . . follow through . . . . follow through . . . .


11:30

Finally, an OK run. 7.24 seconds with one repeat plate. Notice I stayed focused on each plate until the hit was confirmed. I slowed down a bit and kept my head in the game through the run. Could it be faster – oh yeah. There was a 14 year old kid there running his dad’s Benelli M96 for the first frickin’ time!!!!! 4.54!!!!!! Heavy sigh.

Anyway, here’s my run!


7:24

I am beginning to see the real value of a POV camera in training. Midland has a great starter kit for around $100. Shop around; consider adding it as a part of your training kit. You’ll be surprised what you’ll learn when you look over your own shoulder!

Monday, October 29, 2012

Commentary - Do you “Run Deep?”


I’m on the road this week and watched “Almost Famous” tonight. . . . good movie about a young reporter on a road trip with the band “Stillwater” writing an article for Rolling Stone. It’s a journey of discovery for the reporter, the band and the fans that follow the band. As the credits begin to roll the band is shown on the cover of Rolling Stone with the title “Stillwater Runs Deep”. Throughout the movie the “breadth” and the “width” and the “depth” of the characters was evaluated, revealed and developed. So it got me thinking . . . . do you run deep?

How does this apply to personal defense? Well, all I can offer is my point of view; please feel free to add your own thoughts in the comments. It takes “depth” to defend yourself, your family and your friends. On many levels.

It takes “depth” of character to choose to be a “sheepdog” and all that entails. You have laid out a plan, evaluated your weaknesses, and developed training programs to strengthen them. When you look in the mirror you see someone willing to defend another, willing to stand against evil with a strength that allows no space for defeat. Your character has “Depth”.

Physically you have looked at your weaknesses and strengths. There is much more to personal defense than getting the first hit in a sub-2 second time. There is physical strength, endurance, flexibility, stamina. Where are you in these areas? Are you improving/working on them? Have you acknowledged true physical limitations and found “solutions”? Physical “depth” can easily mean the difference between the “quick and the dead” . . . . I would prefer you be quick. Develop physical “depth”.

A warrior is “deep”. I write this at a time when the news (well, Fox) is filled with tales of the ex-seals that gave their lives in defense of Americans in Benghazi. It’s a tale worthy of warriors – surrounded, out manned, brutal, violent, raw – seemingly betrayed by an Administration too weak to act. Yet, they died as a true warrior does – with honor in defense of the defenseless. It was a “good death”. Are you a warrior? Is your soul deep enough to place the welfare of another above yours? I suspect you would surprise yourself. Foster this spirit in yourself. Don’t take easy outs when training. Challenge yourself, endure a wide range of weather, take a wide range of trainings, learn a broad range of weapons. Become dangerous. Become deadly. Develop the depth of a warrior.

Are you emotionally “deep”? Being a “shooter” isn’t being a “bad ass”, it’s being able to BE a bad ass if the situation calls for it. It’s being able to be violent, ruthless, vicious, tender, loving, kind . . . . It’s being able to love people in your life, being able to love people in general and to choose to be a ruthless killer if need be to defend those in your care. For me this seems to be a life long journey – to develop the emotional part of my soul. Become “deep” – it will serve you and those you love well.

Does your skill set run “deep”?  We all have favorite weapons. I have my Glock 17, my Springfield 1911, my Panther Arms AR – and I know them well, I shoot them well and I can maintain them. What if my “battle buddy” has an M&P, a Colt, a Sig, an H&K . . . . I’m working on it. Learn your craft – handguns, long guns, shotguns, knives, hands, knees, teeth . . . you will need to fight with what you have at hand. Fate can hand you terrible odds, slim weapons, horrible environments . . . . yet you CAN win. Develop the depth to make survival the likely outcome.

Can you keep your “head in the game”? Do you have the mental depth to remain focused, intent, functional when the whole world turns to shit? Do you push your limits? Put yourself in situations where your whole being tingles with “what the hell am I doin’????” kinda feeling? We will seldom be able to pick our battle fields or engagement time . . . . mental depth will save your life – period!

Close Quart Combat demands depth. Defensive encounters require a broad range of skills – physical and mental – to be the victor. It is a crucible that is an unflinchingly brutal and violent test of your depth as a warrior. There is no second place – only the living and the dead.

Work on being the one that lives . . . .

Thursday, October 25, 2012

Training – A Little “Indoor Range” Practice


I suppose you could consider this a fairly unnecessary post.  But for me it serves two purposes – first, it’s a good excuse to try out my new Contour ROAM camera – and do it inside, it’s colder than crap outside right now.  (yeah, yeah, I know – I keep harping on training regardless of weather, but come on – 70 degrees to 40 degrees in 5 hours??  I’m not ready for that yet!!)

And, secondly – dry fire on a range, conducted with purpose can be very beneficial.  So, here we are.  The video displays my “indoor range” at the far end of my office.  I use reduced size IDPA targets (H/T to  The Balloon Goes Up), my carry weapon and holster and a 9mm LaserLyte cartridge.  The video explains the rest.

Enjoy! (or not . . . really up to you.  Smile )

Indoor Dry Fire–Glock 17, 9mm LaserLyte Cartridge, reduced size IDPA Targets

Review – Initial Thoughts – Contour ROAM


When I began my series of posts on movement – I realized that it’s a difficult thing to see and understand while looking at a series of still photos or even video shot from a side view. So, I began a search for a wearable camera that could show the movement from the shooters POV.

The end of last week I chose my tool – the Contour ROAM wearable video camera system.

clip_image002

I purchased a system that was just one generation back, a $60 savings on Amazon over the current generation. The biggest difference – the new generation has a 60fps option where the ROAM has only 30fps. Not really much of an issue for what I want to do.

The camera is rechargeable with 80% charge in an hour and full charge in 4 hours. It does not come with a memory card – I added a 32GB MicroSD card and a rail mount adaptor to add weapons mounting capability and a head band. The system comes with a number of mounts as well as the ¼ inch standard camera mount in the bottom of the camera.

Custom software allows you to adjust the size of the video you want to take – larger size, more storage is taken up, etc. I opted for the 720P setting to begin with, we’ll see where it goes.

Audio pickup is simply excellent. I have built a short video of and “indoor range” trip in my office using the LaserLyte cartridge in my carry weapon. I’ll post that shortly to give you an idea of the quality of the video and audio. I suspect that outdoor, video in reasonable light, will be pretty good. Inside (amazingly crappy day today), mmmmm . . . not so much.

The camera is simply linked to your computer via a USB cable and video can be easily copied from the MicroSD card to your desired folder on your computer. It generates a .mov file that is easily displayed using QuickTime. There is free storyboard software available from Contour but I use Pinnacle Studio 12 Plus which I have grown to like very much.  A quick “look-see” at the home site for Pinnacle seems to show they are on version 16 . . . . heavy sigh.  Yet, I am very happy with Studio 12 Plus for my needs.

Once I have a few miles on the system, I’ll do an update but so far I’m pretty impressed with this little fella – especially considering the price. So, if you are interested in filming your progress on the range, a trip down the river in your kayak, your jump from 10,000 feet or just your latest paint-ball war, this system might just fit your needs!

Monday, October 22, 2012

Review - PPOTH Instructor Course Oct 19-20 2012 After Action Report - AAR


The NRA’s Personal Protection Outside the Home is one of their most demanding courses and their answer to teaching a shooter the skills and techniques required to defend themselves outside of their homes using a concealed carry weapon.

Taught over two days and focused heavily on the use of a concealed carry weapon for defense it covers everything from a person’s level of awareness to the proper way to present their carry weapon through a two-day, broad series of classroom and live fire exercises. Students are required to have a much higher level of proficiency with their handguns prior to being accepted to the class and leave with the beginnings of a broad range of skills that can be used to defend themselves, their family or their friends should the need arise.

If this sounds demanding, busy, focused, intense . . . . it is. Now, imagine what it’s like to teach the instructors that will teach this course.

This course was taught by Darin Van Ryswyk, the founder and owner of “CWR Firearms Training” of Ames Iowa. Darin was my very first NRA Training Counselor and after experiencing four other Training Counselor or NRA National trainers, he remains the standard IMNSHO. He is a police officer by profession, a former tactical team member, a trainer for local law enforcement and currently a Captain in charge of over 30 police officers. If you ever have an opportunity to attend one of his courses, take it - you’ll have a great experience and be a much better shooter or instructor for the experience.

I was more than pleased when Darin invited me to be an assistant instructor. While I am very comfortable teaching new shooters, or introducing experienced shooters to more demanding skill sets – this would be my first time teaching experienced NRA Instructors a new skill set. While I am not overly prone to “nerves”, it mattered that I do a good job so I was a bit on edge as the course began and introductions were made.

The course was attended by Shane, Todd, Leo, Corey, Nathan, Charles and Christopher. All had Instructor credentials including the NRA PPITH. They consisted of law enforcement folks, ex-military and life-long shooters that were well experienced. Honestly, not an audience for the timid! It’s always interesting to watch the “scope out” process at the beginning of a course – heck, I do it myself. While they had an experience of Darin, they had no experience of me. While I felt a bit under the microscope for the first hour or so, once the course began and the on-going, two day instructor candidates teaching students and other instructor candidates was under way, things planed out and we were off and running.

The mechanics of an instructor’s class revolve around teaching the skill set of, well, teaching. The best way to do this is by having these instructor candidates teach the ENTIRE course to each other and to us. This is followed by the “sandwich method” of review – tell them what you liked, suggest improvements and end with something you really thought they nailed.

Teaching this course is like riding up and up and up in a roller coaster then reaching that tipping point where you are charging down the rail – and that’s how the two days went.

The very first lesson was giving a range safety brief. We divided the class into two groups of three, gave them 10 minutes to prep and then had them deliver their briefs. Once the brief was done we would ask for feedback following the “sandwich method” so the candidate instructor could hear how well he had done and find areas that he could work on. This was the entire first day and covered everything from the range briefing to levels of awareness to proper presentation of their weapon from both an open-carry position to concealed carry. The great thing about teaching folks with such a broad range of experience is that the personal skills of each instructor are brought into the room. Frankly, you can learn as many new skills from folks like this as you can share from your own experience. It is certainly a very rich environment for folks that are willing to learn something new!

As is typical with this level of training, day one ended with everyone pretty well shot. An evening in my motel room and a long nap in the chair were my night’s activity before I packed it in to rest for day two!

Day two is spent entirely on the range. There are approximately 30 different drills that are gone through, first dry fire and then live fire. Here, on a live range, their skills as an instructor are really being watched. While it is one thing when you are simply watching their weapons manipulation skills when they are only doing their own range work, it is quite another to evaluate their skills when they are teaching those skills to others. Detail counts. Their ability to safely, quickly and consistently present their weapon is important – their ability to teach that skill to another shooter is why we are all here.

Darin was able to round up a couple friends that have taken courses with him and shoot IDPA with him as well. Sam brought her boyfriend Dana along to be the class’s range students. Sam is the more experience shooter with Dana being a fairly novice shooter. It was the perfect mix for these guys to teach. This left 2-lanes open so instructor candidates would often fill the empty lane.

Again, the process was the same as day one. The drills were assigned the night before. Their homework was to become completely familiar with these drills, write up range note cards and come prepared to fully teach their drills to the students on the lanes. At this level, these are very detailed drills. You are emulating (and in our case actually are) teaching new students that have never engaged multiple targets, never used barricades or cover in their training. It takes real focus for each and every drill. Add in live fire and the stakes become much higher.

The second day went from simple presentation of, and engagement with, their weapon from open carry to presentation from concealment while moving to low cover and shooting with the use of cover.

Along the way cartridge failure as well as weapon malfunctions and clearing techniques were all covered as well as the process of scanning and evaluating their environment after an engagement. And, since Darin is a law enforcement trainer as well, proper procedures following a shooting were presented as well as Iowa law regarding the use of a firearm.

Once the drills were over – over 7 hours after they started – I covered the contents of my Blow Out Kit, we finished up a few loose ends and they headed inside for their final exam. These were quickly finished and reviewed and the course ended with the presentation of Darin’s course completion certificates.

This was a solid bunch of shooters as well as instructors. They were all serious, their head was in the game through two very busy days and they were great with the students on the line. There is little doubt they’ll do a fine job when they begin offering their own PPOTH courses in their individual area.

As for me personally, I truly appreciated the ability to get my “feet wet” with Darin. And, I found places where I could contribute to as well, both in the classroom and on the line. It was a great two days! So, a final thanks to Darin and to the folks attending, you guys will make great PPOTH instructors!

Here are some photos of the day.


PPOTH NRA Instructor Course 10–19,20 - 2012

Update 10/23/2012:     The following is a video montage of various short clips from the shooting drills that were conducted.  Each Instructor Candidate conducted an assortment of drills. (NOTE:  Video shot “in front” of the firing line was shot with me behind the line holding my Android phone out to film the line as they shot – NO ONE stepped in front of the line.)

PPOTH NRA Instructor Course–Shooting Drills–10/20/2012

Thursday, October 18, 2012

One more time . . . . a training I shall go . . . .


Tomorrow and Saturday I have the pleasure of assisting in a NRA Personal Protection Outside the Home course with Darin – the chief honcho at http://cwrfirearmstraining.com/.  Darin was my first TC for the NRA Basic Pistol course (along with Shotgun, Range Safety).  He’s a great instructor, a firearms professional and Police Officer.  I appreciate being able to lend a hand, observe him and get to do parts of the course while he watches me.  It will be the first time to stretch my new T/C creds, I’m looking forward to it!

The range time will be conducted by one of his range training officers – that should be pretty interesting as well.  Both Darin and Nate are competitive shooters so lookin’ to pick up quite a bit there as well!

So, off for 2 days, can’t wait to let you know how the course goes.  I’ll post a full AAR over the weekend.

Have a good one!

Wednesday, October 17, 2012

Just the Basics – Movement Part 1


MOVE, MOVE, MOVE . . . . .

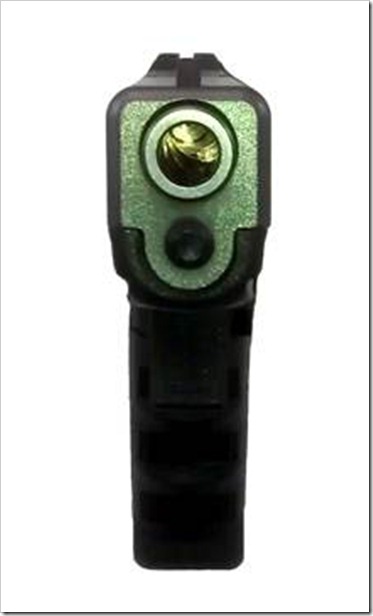
How many times have you heard that during a defensive pistol class?? “GET OFF THE X!!!!” There’s urgency in the voice – a timber that says “Yep, he ain’t shittin’, I better MOVE!!!”      Why should I “MOVE!!” at all, why not just get a good stance, draw, aim, get a good sight picture and shoot?? What’s all the hub-bub about ”MOVE!!!”

Well . . . . because . . . .
clip_image002

                         GUN!!!!!!!!!!!!!

That’s why.

The topic of “MOVE!!!” covers a lot of ground, much more that a single post. It seems like we have been touching on a lot of those types of topics recently, so let’s just jump right in with the first of probably 3-4 posts and probably a couple videos as well.

Fortunately, few of us have had this intimate of a view of a weapon in the hands of a person intent on killing us. That’s one of the advantages living in a civilized society. For this majority, the idea of move or die is pretty much a mental exercise – you have to generate a scene in your mind’s eye, put yourself in the scene and then react accordingly – to imagine the experience.

For those who have experienced another human being trying to end their life, it takes little to convince them that movement on their part is a good idea.

The Basics

Don’t be a “Range Target”: Think how most of us practice on the range. There is a little circle with a black dot in the middle or a silhouette target and it’s nice and stationary on the far end of the range. We put our “mechanics” together and engage the target - then evaluate the holes. All the time in the world to engage this bad guy . . . . that’s standing there . . . . not moving . . . . giving us all the time in the world . . . .

This is YOU – the range target – doing all the basic mechanics just right – as you engage an attacker – while being a “Range Target”.

One more time - don’t be a “Range Target” – don’t give your attacker a freebie by just standing there like a target at the far end of the range. MOVE!!!!

Slip inside their OODA loop: If you MOVE!!! you force them to react to you, not the other way around. As long as you’re moving they have to continually reacquire you as a target, to evaluate where you’re going, what you’re doing – this consumes time and ammunition if they are trying to drop you.

Distance is safety: The farther from the attacker, the more options you have. You can move towards some type of concealment, some type of cover, towards other people – in a direction AWAY from the attacker. This buy you time – to orient, to draw, to acquire, to shoot, and to escape.

It makes you more dangerous: Attackers – other that truly committed ones – attack you because they see you as an opportunity for a quick score. But once you refuse to be an easy target, the math of the attack changes for them. If they realize that you – too – are armed and willing to kill them – the math changes even more. These doubts, these recalculations again allow you to accelerate the OODA loop and use it to confuse, evade or shoot your attacker. You are an armed, trained and skilled shooter – you ARE dangerous.

Keep moving: Once you have successfully escaped your attacker – keep moving. Make the call for help from the police. Tell them the “who, what, where, when” of your story – CLEARLY IDENTIFY yourself. And, remain vigilant that your attacker hasn’t simply changed direction and is still hunting you. If you can fully leave the area – leave the area and then file your report with the police.

Remember: “Range Target” = death, “MOVE!!!” = better chance of survival.

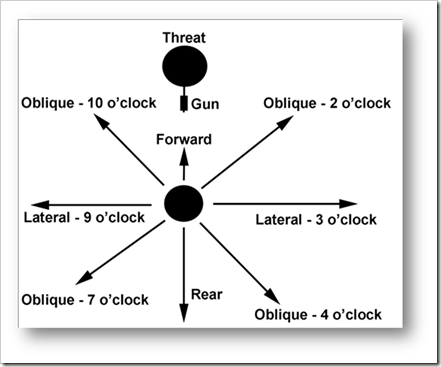
So where do I “MOVE!!!” to?? That’s where the meat of this post, and the follow-up posts will be. Let’s look at eight basic directions and talk about the advantages and disadvantages of each in general. Then, I’ll break down these eight into three groups that I will drill down on with separate posts on each.
clip_image004

Forward/Rear:

Rear: Our normal response is to simply draw and run backwards as quickly as we can while engaging the threat. The advantage is that this is quick, easy and your body considers this “natural”.   There are, however, three big disadvantages to this approach:

You have no idea what is behind you making it easy to slip, trip and fall  - now you’re easy meat for your attacker. Also, it’s difficult to “run” backwards quickly -  an attacker that is chasing you can easily catch you. Finally, the only change you attacker needs to make to keep you in their sight picture is to slightly lower their weapon as you run backwards. Not a terribly difficult adjustment to make.

Forward: This depends on your skill set, on your observational ability while under stress, distance between you and the attacker and a host of other environmental conditions. Your primary reason for this type of attack would be to seize control of their weapon. If you notice that their finger is on the trigger and that the safety is disengaged (or their weapon has no safety – think revolver, Glock), perhaps you are better off play for more time until you can distract your attacker. However, if you are in a confined area, their finger is alongside the slide or above the trigger guard, you can see that the safety is engaged and perhaps even that the “chamber loaded” indicator shows there is not a round in the chamber – well, you have gained some new insights into the attack and perhaps moving forward to disarm or to point the weapon in a different direction or even to gain time to draw your own weapon is, indeed, a viable option.

The risks to a forward movement are obvious – you must “win” or your chances of a trip in a Ziploc are very high indeed. I would consider this option a last resort but, if you choose it, a total emotional and physical commitment will be required of you and it must continue until your attacker is down and no longer a threat.

Lateral Movement – Left or Right: Lateral movements are frequently taught as an early method to “MOVE!!!”. It entails side stepping either left or right as you draw your weapon and engage your attacker. This is a fairly slow type of movement and while better than pretending to be a “Range Target” the adjustments your attacker needs to make to their sight picture are fairly simple adjustments. So, while you might force your attacker to make some adjustments, they are not major by any stretch of the imagination. Another caution with this movement is a real temptation to try to move quicker by stepping over your own feet – similar to some of the linemen’s football drills. While this can accelerate your movement – it significantly increases your risk of tripping and falling. Not a good outcome when facing a threat intent on harming you.

One very seductive reason for choosing one of these two directions of movement (forward/back or left/right) is that you can do them without really sacrificing the traditional two-handed, fully extended grip while shooting. While comforting, remaining a slave to this single way of holding your weapon to engage a threat can greatly limit your ability to “MOVE!!!”. Especially if you want to make moving in an “OBLIQUE” direction one of your options.

Movement on the Oblique: Oblique simply means you are moving at an angle that is something other than 90 degrees to the threat. For training purposes I use directions that roughly correspond to the 2, 4, 7 or 10 o’clock positions. These are not “hard” directions, simply a general direction of movement.

When you move in any of the four directions shown, you have the ability to move your feet in a direct line with your direction of travel and, you can do this with your toes forward. You can use the skillset you learned with the Focal Point Shooting exercises using the ¾ hip extension to engage your attacker when moving away from your dominant arm side.

When moving towards your dominant arm side, it is simple to transition from SUL position to a high ready Focal Point Shooting position. This again allows you to move toes forward while engaging your attacker.

Anytime you can move toe forward, your stability increases greatly – as does your speed of movement. This forces your attacker to respond much more quickly and allows you a better opportunity to slip inside their OODA loop as well.

Oblique movements are going to require a bit more detailing than I can give in a single post. For the next post, we will work on the Forward Oblique movements to the 2 o’clock and the 10 o’clock directions.

Your primary responsibility in a gunfight is your survival, the survival of your family and the survival of any friend in your charge. One of the primary tools you can have in your combat skill set is to accurately engage an attacker while you are quickly moving on your feet.

“MOVE!!!!”

Your life may well depend on it!

UPDATE:  10/18/12 - Typos, grammar – the usual crap . . . .

Tuesday, October 16, 2012

Last Defensive Pistol Classes of the Year . . . .


I am conducting the last Defensive Pistol classes of the year on November 10th and 11th.  They will run from 8AM to 5PM.  The cost is $195 (including range fees) for each class separately.  You can take only DPI or DPII (provided you meet the prerequisites).  Or you can take both for $300 plus the $20 range fee.  And, if you come as a couple or a shooting buddy, the course fees drops $250 for both courses plus the $20 range fee. 

Take a looks at the course descriptions, read some of the reviews, looks at the course photos and then send me your:

  • name
  • address
  • City
  • State
  • Zip
  • Email
  • Phone number
  • Age

And I’ll set a spot aside just for you – there are only 10 spaces available, so sign up soon!

Or, just give me a call and we will chat about it and answer any questions you may have.

See you next month!!

Bill

Sunday, October 14, 2012

Training - Are you being honest with yourself??


Training is the process of “growth” – learning a new skill set, working with that skill set, honing it, refining it, integrating it – making that skill set your own.

It’s an on-going, life long process. Skills left unused erode rapidly. For a skill set that is needed for a short time this presents little concern. However, for a skill set you expect to use over a life time, it is an entirely different matter. The skills required for personal defense using a handgun, shotgun or rifle take effort and dedication to learn and simply REQUIRE a lifetime of dedicated practice. Of course an individual doesn’t need to accept this and can simply visit the range a couple times a year. Yet the purpose of a carry permit, the purpose for the additional 20 oz. or so that ride at your 4 o’clock, is to defend yourself, your family or your friends from an existential threat. Failure is death. Let me say that one more time . . . . . Failure is death. So let me ask a rather smallish question that carries large implications . . .

Are you being honest with yourself??

I know, I know . . . . who the hell am I to “call you out”?? Honestly, no one. I could give a crap what kind of stories you tell at the bar or beauty shop (is that too sexist??? J ) to impress your friends or other gunnies. I simply don’t care. What I do care about is the o’dark-thirty threat that comes through your door, your window or greets you at your car as your come off shift and their intention is to end you. That is what I care about – period!  And, to insure that you are as fully prepared to meet such a threat as is possible – you need to train as if your life depends on it . . . . because it does. So, let’s do a little honesty check. I don’t want to know your answers – I simply want you to be honest with yourself – the only person in this little dialogue that really matters.

1: Is your weapon on your person (or within an arm’s reach) as you read this? If not, why not??? Listen to your excuses – too bulky, too heavy, I’m safe in my home, I forgot. Just a reminder – death comes for us all – don’t position yourself to deliver yourself to evil without a fight. WEAR YOUR DAMN GUN!!!

2: Been to the range today? This week? This month? This year? If you never work with your weapon in the calm of a weapons range, how the hell are you going to do it with death beating on your door?? GET OFF YOUR BUTT AND GO TO THE RANGE. Even if that means you build an airsoft range in your home. Trigger time is trigger time – your body WILL NOT NOTICE THE DIFFERENCE when a fight finds you.

3: Clean your weapon lately? Since your last range visit? Since the summer? This year?? “But, but, but . . . everyone says this model doesn’t need a lot of cleaning.” Bullshit!!!! It’s not about brushing off the GSR and lubing it up (though I have a 1911 that will damn sure hang me out to dry if I don’t lube it every 500 rounds), it’s about getting to know your weapon, making sure there is no on-going damage, gaining the comfort that if need be – you could field strip it, fix it – and get back in the fight come hell or high water. CLEAN YOUR DAMN WEAPON!

4: How’d you do on your last range trip? “Man, did I nail it – great set of targets, most in the black – even at 50ft!! It was awesome!!!” What the hell does “awesome” mean?? Again, I don’t care how your range trip went, not my business really. But, it you’re not being honest with yourself, if you are lying to yourself – you have a problem. Be specific. For example, my last range trip I went through 80 rounds with the Ruger 22/45 and had a Combat Effective Hit Rate of 74/80. I went through 100 rounds with my G17 with a hit rate of 88/100. My range goal – shooting “at speed” - is 80%. I can quantify my results. Actually, I’ve grown fond photo-documenting my targets between sessions – it makes it hard to lie to myself. TELL THE FRICKING TRUTH TO YOURSELF – PEOPLE ARE DEPENDING ON YOU. Document your session – type of weapon, number of rounds, distance, type of engagement (from low-ready, from holster draw, from concealment . . . .), photograph your targets, videotape your training – be serious – failure in the real world is death, period.

5: How many rounds downrange this year??  “Man, thousands and thousands!!” Really?? If so, congrats – it take a lot of hours on the range to send a thousand rounds downrange. If I’m really flowing I can do 100+ in an hour. Add documentation, cut that by 25%. Again – not calling you out, but be honest with yourself. Good range time, with a good training plan and solid documentation is a guarantee of progress. Putting holes through paper? Not so much . . . .

6: Take any classes this year?? “Nah, range time a couple of times a year is all I need to keep up-to-speed.”   Again I call BULLSHIT!!! Training classes, with multiple instructors, is a great way to accelerate learning this skill set we call “personal defense”. Find at least a course a year and take it. Yes, I know they can be expensive. Yes, I know there will be shooters there that will make you look pathetic (hell, I know a 14 year old kid that makes me look pathetic on steel).  I know you know everything there is to know on the topic . . . . yet this is a skill set you are betting your life, your family’s lives and your friend’s lives on. Really . . . . . you know everything?????

Tonight, as you get ready for bed, I want you to have a bit of a conversation with yourself in front of the bathroom mirror. Are your doing 100% to learn this personal defense skill set? Are you spending the range time, weapons time to become proficient with your weapon of choice? DO YOU CARRY EVERY PLACE THAT YOU ARE ALLOWED BY LAW TO CARRY??

You know the answers to these questions . . . and more. Starting tomorrow . . . .

Be honest with yourself . . . . lives depend on it.

Friday, October 12, 2012

Training – Winter is coming, have your adjusted your range sessions??


Winter is starting to nose under the tent.  A few mornings below freezing, dark clouds tending towards “snow clouds”, a slow but steady drop in daily highs.  I even broke out the leather flight jacket this week.  Seasons are about to change and, with that, so is my range sessions.

Winter wear for me typically is an Underarmor T-shirt, some kind of polo or heavy knit shirt and my leather flight jacket.  Really cold days may see a switch to a Columbia multi-layer system, but that is typically during sub-zero period of winter and usually lasts a month at the most.  What does this mean – other than bulking up a bit when leaving the house?  It means more crap to clear out of the way when you draw from concealment.

If you read my post on “The Draw”, you know I promote what I call the “grasp and clear”.  Put the 4-fingers of your dominant hand under ALL the garments that cover your concealed weapon.  Grasp them firmly, firmly drag ALL of them well above your weapon’s grip, pin them up by forcing your thumb into your side, drive your hand down and firmly grip your weapon, draw, rotate and engage as required.  It is the process of “grasp and clear” that needs your effort during this transition to more clothing.  It can be accomplished through dry-fire or range time, but it must be done.

The advantage to range time is that it lets your body adapt to the cold and let’s you notice where you need attention.  Feet cold?  Hands?  Can your function well with cold hands?  I avoid gloves when handling weapons like the plague, I simply do not feel comfortable with them.  And yes, I have spent a range day with wind chills in the –20s with out gloves – suck it up. 

So I worked through my typical drills with both the Ruger 22/45 and my Glock 17.  As I have stated before my benchmark is 80% or higher combat effective hits – rounds within the silhouette.  Today’s result?  down 6 for 80 rounds with the Ruger with 20 rounds each at 15ft, 21ft, 30ft and 50ft.  or 92.5%.  I’ll take it.  The Glock 17 went 100 rounds with 20 rounds each at 15ft, 21ft, 30ft, 50ft, and a repeat at 15ft with a Roger Phelps exercise called “The Zipper”.  I was 12 down for 100 rounds or 88%.  Again, I’ll take it.  A couple things of note while doing these drills.

Today I had on my Underarmor T-Shirt, a 5.11 Shirt and my leather flight jacked zipped about half-way up.  I carry at 4 o-clock and ran two 10-round magazines with each drill at each distance to force a mag change.  With this much crap between you and your weapon, “firmness” is paramount.  A “firm” grasp and a “firm” lift to clear all the garments is a must.  A “firm” grip and draw is required to help clear the weapon along the outside of your garment bundle.  Once clear, you need to be aware that a bit more space between body and weapon is required for the rotation.  After that – rock and roll!!

My typical practice engagements run 2 to 4 rounds.  I simply press the trigger “a few times” without really paying attention – my focus is on the threat.  I do all of these exercises using Focal Point shooting – there is no aimed fire with the exception of sighting a bit more carefully at the 50ft distance simply because I would have time to do so.  Once the 20 rounds are complete I reload the mags, load one into my weapon and reholster.  (General note:  YOU HAVE ALL THE TIME IN THE WORLD TO REHOLSTER – TAKE YOUR FRICKIN’ TIME.  YOU HAVE MUCH MORE CRAP TO DEAL WITH WEARING WINTER GEAR).  After each draw and engagement, and at the end of the 20-round drill as well, I take the time to completely configure my clothing.  My shirt is smoothed, my jacket adjusted to fully cover the weapon.  Remember, even though you are drawing multiple times – you are practicing for that single draw and chances are your clothing will be fully “adjusted” at that time.

Today was really the first of the “winter” drills for me.  There were some hang-ups with one going sideways enough I terminated the process, reholstered, re-adjusted my clothing and had another go at it.  Again, given the amount of crap covering your weapon, it is all to easy to get snagged in layer upon layer of clothing and end up fighting your weapon and the draw – STOP!!!  If you are spending more time fighting your clothing and less engaging the threat – reset to a dry-fire mode and work on it a bit more.

If you carry for personal protection, if you live in climes where exposure to air can easily freeze your skin, if you are about to begin to “layer up” – your range practice need to change as well.  While your winter gear can keep you nice and warm . . . . failure to adapt and practice drawing your weapon from concealment can lead to a very, very cold and permanent permanent dirt nap.

Training . . . . Do you offer a “Concealed Carry” class?? I couldn’t find one on your website . . . .


A local friend just received her carry permit and posted a photo of it on her Facebook page.  I sent my congrats and then added a “shameless” post that I was offering a Defensive Pistol I & II November 10-11.  A friend of hers asked that I PM her about the courses.   I sent her links to my company page as well as the blog.  Her response went something like . . .

“I looked over your site, I couldn’t see where you offered a CCW class.”

Heavy sigh.  In fact, I don’t offer a “CCW Class” in the context that most Iowan’s mean.  Iowa went to a ‘Must Issue” state in January of 2011.  Prior to that, if the county sheriff didn’t like you – you simply couldn’t get a permit.  Some refused to issue them for “the safety of the citizens” . . . . and a host of other reasons.  Iowa law now states that after gaining a basic understanding of firearm safety and taking a course presented by an NRA Instructor or LEO, a permit must be issued provided they pass a standard background check.  There is no requirement for range time or the demonstration of any kind of weapon handling skill at all.

And, honestly, I have absolutely no problem getting as close to constitutional carry as we can – you’re a citizen – you can carry.  Period!  But . . . . (you just knew there was a ‘but” comin’, right??) I AM a firm believer that any student I turn out must know the basics and must be able to demonstrate them TO ME.  Does this conflict directly with the 2nd Amendment – yep, no two ways about it.  Yet – if I am expected to sign on the dotted like that I trust this person to safely handle a firearm – then I damn well want to see them actually do just that.

During the first 6-months or so I jumped in with another instructor and we taught a very good (all IMNSHO, of course) 4-hour basic firearm safety course.  This met – and still does meet – all Iowa requirements for a firearm safety course.  There was no range time or fire-arm handling of any kind in the course.  In half I focused on the firearm and handling them safely and in the other half the other instructor focused on Iowa law.  $50, 4-hours, pass a background check and you’re on your way to your permit.

Since then I’ve stopped working with the other instructor – just not enough demand to justify two of us in the classroom and he does a great job on his own.  And, I’ve had a bit of a change of heart. 

I ask students that are about to carry for personal protection to think very hard about what they are about to do.  Are you ready to kill a person?  I could beat around the bush about the word “kill”, yet – that is the second worst case scenario that you will have to survive.  The worst scenario??  YOU die.  Dirt Nap.  Ziploc City.  It’s at this point I can usually see a few glimpses of doubt in a couple of the folks.  Just to clarify the point my second question is “Are you ready to die?”  To leave your life unfinished, your kids and grandkids without the benefit of your life experience?  To leave your spouse to handle the rest of their life on their own?

Those two questions usually put things in perspective.  I am interested in teaching a set of skills that give the person a fighting chance and that, if need be, will make sure of who – exactly – leaves the fight in a Ziploc.

So yes, I do teach a CCW class.  I currently teach three of them.  But they require time, effort and much more than simply sitting in a seat for 4 hours.

On top of that – they are merely a starting point – a glimpse of the skill set a person needs to integrate into their life to truly give themselves the best possible chance to walk away from a live/die fight.

If you are a new shooter.  If you are looking for a skill set to defend yourself, your family and your friends – please . . . . there are no shortcuts . . . . it’s about so very much more that a simple slip of paper in your wallet or purse that says you can carry a loaded weapon . . . . it’s about learning a life style and that takes time, effort, practice and commitment . . . .

I’d love to be part of your journey.

Warm welcome to Joey . . . .


Welcome sir, retired NAVY are always welcome on the premises!!  I’m afraid I’m not a coffee kinda guy (even after 21 years in the AF), yet I have a bottle of Templeton tucked away for new friends!  Looking forward to your thoughts and experience adding to our group here.

Bill

Thursday, October 11, 2012

Wednesday, October 10, 2012

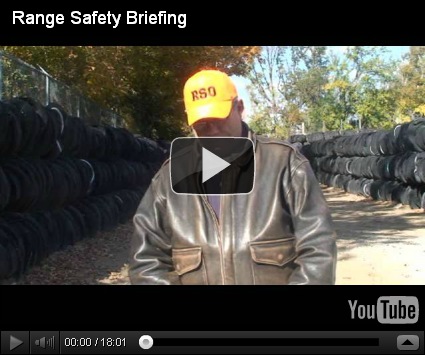
Just the Basics – Range Brief


When you join a shooting range, one of the standard procedures is to attend a “Range Brief”.  These cover the standard operating procedures of the range, basic safety rules and what the expectations are of the members.

Every range is a little different.  While the basics are the same, all ranges have little quirks that need to be addressed by the ranges RSO – Range Safety Officer.  Honestly, this whole process, while necessary – can be a bit difficult to pull off with the schedules everyone tries to keep. 

The solution that our range came up was to make a comprehensive Range Brief video followed by a short quiz that will be kept as a record of the shooter’s participation.  While not a perfect solution, it meets the requirement our board as well our insurance company.  I thought new shooters – considering going to a new range – might find some value in watching a typical Range Safety Brief.

Enjoy!  As always – your comments are more than welcome.

Monday, October 8, 2012

Contrats to the newest NRA BP Grads . . . . Great Job!!


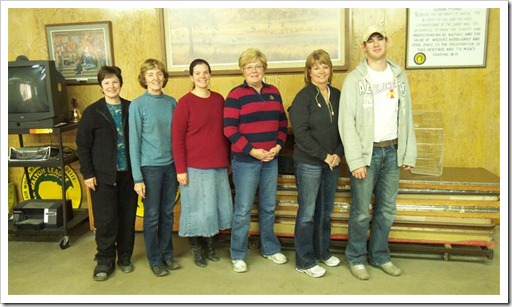
This class just fell out of the “new shooter universe” over the past few weeks.  A young couple that really wanted to take it found that yesterday – Oct 7th – was the only day they could find in the next few months.  No problem – so a date was set about a month ago.  (Actually, they canceled yesterday – very sudden family illness but as of last night things were headed in the right direction.)  Then a friend said there were 5 women in a near-by community looking for a course – two were able to come.  And his wife, daughter and sister-in-law wanted to come.  Finally “The Boy” had not taken the NRA Basic Pistol class so we threw him into the mix.  Five ladies and The Boy – what a GREAT DAY!!

Biggest fear for these ladies?  Most had not handled a pistol at all and they were moderately nervous about them.  And – taking a course from “a man”.  Well, we worked them through all the basics – they asked tons of questions about everything, very fun – and the gun handling exercises.  That really seemed to take the edge off quickly.  As for being “a man” – honestly, I don’t want to change that aspect of “me” – but I’ve had 46 years of training from a pretty good task-mistress so they discovered my secret – I’m really a rather large teddy bear.

Seriously, they were exactly the type of folks the NRA was thinking of when they put “attitude” in their goals statement.  They were serious, focused, asked great questions about everything – honestly an instructor could not ask for anything more.

As for range time – again they did a great job.  I confess the military side of me comes out on the range.  I run it very tight – everything done on command – loading magazines, picking up the magazine, picking up their handgun, walking to the line, load and make ready, commence fire, unload and show clear, leave the line and return to the loading tables, ground the handgun . . . .  It all sounds rather tedious, yet that’s how I do it.  Women seem to accept this process without question – guys like to rush.  (The Boy provided a good example as well, must be all those years on the range with the old man).  I have them shoot two targets from 21 feet – one for practice and one for “qualification”.  They did just great! 

The Boy showed his skill and his heavy range time with nice, tight groups in and just outside of the black.  Some of the ladies commented that they would be happy to pay him to shoot a target to show to the hubbies – he quickly came up with a $50 price (he’s a business major  Smile  ) but I don’t believe any transactions were finalized!  Fun banter though, lots of chuckles and giggles ensued.

Back for the test and class photo.  Again, their focus and attitude showed through with upper 90s for all.

100_0954 (Small)

So congrats to Phyllis, Marilyn, Kristen, Denise, Cheryl and Mike – GREAT JOB!!!

Friday, October 5, 2012

Just the Basics – BLAMM!! BLAMM! . . . . click . . . . Weapon Failure


A weapon failure is probably the single biggest failure that folks DO NOT train for. It simply is not on their radar . . . . at all. (Secret Give Away Follows) One of the questions on the NRA Basic Pistol test goes something like “A safety is a mechanical device and can fail.” T or F. Obviously TRUE and it reminds folks taking the course that shit happens – including their weapon going BLAMM!! with all safeties engaged and perhaps even the darn thing being “empty”. The dirty little secret about this question is that it’s much “bigger” than just the safety – the ENTIRE WEAPON is a mechanical device . . . . and can FAIL.

So let’s chat about this from a bunch of different aspects – on the range, during training, in a fight and some different types of failures.

There are a number of “little things” that can result in a Weapon Failure:

Ignorance: Range time – and a fight for your life – can boost a shooter’s anxiety level. Adrenaline pumps, focus is lost, a shooter’s ability to move and their dexterity are altered, mental focus changes . . . . all of which effect the shooter’s ability to fully use their weapon. If the shooter is not fully and totally familiar with their weapon system – if they are ignorant of its operation, clearing procedures, simple “fixes” – it is quite easy for their weapon to “Fail”. Obviously the “failure” is between the ears of the shooter – yet the result is the same, a crappy range trip or a trip home in a Ziploc.

Know your weapon systems – both primary (your carry weapon) and your backup systems – a tactical pen, flashlight, knife, BUG – and train in their use and deployment. You may only get a single chance to switch to them – ignorance kills.

Poor Maintenance: “Hell, I haven’t cleaned by weapon in over 2,000 rounds!!” Really?? Then you’re a DUMBASS!!!!!. I realize all the macho/macha feelings around having a very reliable weapon – of it always going BLAMM!! when the trigger is pressed – I get it. So, let’s keep it that way! Take some time to tear it down, clean it, cycle it and get it ready for the next range trip. Ever watch video of soldiers just back from a patrol? One of their first actions (well, perhaps after a hot meal) is to do a quick field strip of their weapons and clean them. There is no guarantee that some enemy may not choose the very next minute to launch an attack on their base/OP. A dirty weapon is a dead soldier. You can learn from our soldier’s hard-won experiences. You carry around a dirty weapon and depend on it to save your life – your family could easily get a life insurance payout, just because you’re being lazy.

During your cleaning process you can also do a detailed inspection of your weapon. Any cracks, chunks of chambers missing, distressed springs, slides, frames? While you are brushing, scrubbing, rubbing – keep your eyes open and look for problems. The parts you are cleaning are the parts you are depending on to protect you, your family and your friends – take it serious.

Abuse: The weapon on your hip has one purpose and one purpose only . . . . to save your life, your kid’s life, your friend’s life – so don’t abuse it. Carry it in a good holster, shoot the proper ammunition, not your friend’s latest “hot super-duper zombie killer round”. Keep it clean. Keep it dry. Store it properly. If you subject it to a real test by weather, water and mud – treat it with the love and respect it deserves while you clean it. Abuse your weapon . . . . ? Karma can be a bitch.

Age: Yeah, yeah – I know, that 1911 served your great grandpa well in the trenches of France and by golly it still does a great job defending your family today. Really?? Hasn’t it earned its retirement?? I understand the attachment to legacy weapons like this – truly I do. But after decades and decades and decades of service – these old weapons deserve their rest in the gun safe. Take them to the range periodically, share their stories with your friends and kids, keep their memory alive – but, please – keep a newer firearm at the ready to defend what’s important to you.

So let’s talk about your response to a weapons failure on the range and in the real world.

Train like you fight: Sounds simple but it’s complex enough that most shooters simply do not train on the range like they would fight for their life. They stand is a cubby hole or behind a table, their weapon, magazines and ammo carefully set before them and they spend an hour or so putting holes in paper. Please, there is NOTHING WRONG with this process; I just want to remind you that THIS IS NOT HOW YOU FIGHT FOR YOUR LIFE. Please find some time to find a range that you can periodically use to incorporate holster draw, movement and some CQC drills because that IS how you fight.

You’re in the “Big Box Store’s” parking lot. Christmas time. Lots of presents. Still a good chunk of change in your pocket. You hear persistent footsteps behind you as you walk way the heck to the end of the row to get to your car – pretty busy this time of year. Spidey senses tingle, you stop, turn and see a nasty lookin’ guy very intent on YOU. You drop your bags, warn him off, hand on your weapon – he doesn’t stop.

50 feet you draw . . . . . you move to your right between the parked cars . . . . you warn him off again, (this CAN’T BE HAPPENING – YOUR BRAIN IS SPINNING – PLEASE STOP!!!) – he keeps coming.

30 feet . . . . . he’s following you between the cars . . . . his pace is quickening, he seems to have a good sized hunting knife in his hand . . . . . . he’s still comin’ . . . .

No one around . . . .you yell one more time. . . . . you move between the cars in the next row . . . . . he’s still coming . . . . . closing the distance . . . . . 25 feet . . . . . he’s not stopping, he’s not afraid of your or your gun . . . . .

You press the trigger . . . . .

Click . . . .

Your training runs your body . . . .

Still moving between rows of more cars . . . . .

. . . . . SLAP, RACK, SHOOT!! This doesn’t fix the problem. LOCK THE SLIDE, DROP THE MAG, RACK, RACK, RACK, NEW MAG, SLAP, RACK, SHOOT!!!

Nothing, nada, zip . . . .

. . . . .

. . . . .

RRRRRRUUUUUNNNNNNN!!! Create distance, grab your BUG – or grab multiple backup weapons – knife, flashlight, tactical pen – look for cover, look for an exit, look for help, remain aware of the threat . . . . .

The thing that will kill you in this spot is “brain freeze” – you can’t believe it didn’t go bang, you can’t believe all those drills your practiced didn’t make it go BLAMM!!, you can’t believe your attacker is almost on you, you can’t believe you’re gonna die . . . .

So – don’t. FIGHT!!! FIGHT FOR YOUR LIFE!!!

If you never practice for this event, if you never even consider the remote possibility that your primary defensive weapon can go belly up just when it HAS TO WORK – please, incorporate this possibility into your range work once in a while.

You’re carry weapon is a complex machine. Machines fail. Yours can fail . . .

Failure to train for a complete weapon failure may well be the last mistake you ever make . . . .

Thursday, October 4, 2012

A warm welcome to Huey . . . .


I had Huey of Huey’s Gunsight stop by and decided to join . . . . welcome sir, nice to have you along.  Please take time to visit his site – he is much more of a gearhead than I hand has great info available for the reading.

Welcome sir, look forward to your thoughts and ideas!

Bill

Wednesday, October 3, 2012

Just the Basics – BLAMM!! . . . . Click! Feeding and Ejection Malfunctions


Weapons that fire projectiles “eat” ammunition – cartridges specifically. It is beyond the scope of this post to cover all weapons that fit into this category. I am going to focus on the two the folks I work with have to contend with most frequently – a Double Action Revolver and a Semi-Automatic Pistol. (I don’t care if it’s a single action, double action or safe-action – the malfunction and its clearing process is the same.)

Double Action Revolvers: DA Revolvers are “fed” by a rotating cylinder. Each chamber in the cylinder holds a single cartridge. A “Failure to Feed” malfunction would imply that the cylinder or the frame is damaged enough that the cylinder can no longer rotate. In the midst of a fire-fight, where your life hangs in the balance, this is a “holy crap” of the highest order and would demand immediate retreat or the rapid deployment of either a BUG (Back Up Gun) or a secondary weapon system – knife, flashlight, tactical pen.

A Failure to Eject, while certainly possible (a casing expands so much that it refuses to be ejected from a cylinder), it is not a common occurrence. A very firm strike of the ejection rod is usually enough to unseat a stubborn casing. (If it does not – see the above paragraph.) If this does not result in the ejection of the empty casings, a rod can be used on each individual chamber of the cylinder until the ceased casing is found and hammered out of the chamber.

The final result ends up that clearing a Feeding or Ejection malfunction in a Double Action Revolver is very rare and misfires are usually resolved with the simple press of the trigger to rotate the cylinder to put a fresh round in firing position.

Semi-Automatic Pistols: When dealing with a Semi-Automatic Pistol, there are a number of mechanical processes that must occur, in the proper sequence, for the weapon to function properly. The magazine must properly push up a new cartridge each and every time a new one is stripped off its top, the magazine must be properly seated in the magazine well contained in the grip of the weapon, the throat into the chamber must quickly and easily guide the cartridge into the chamber, the ejection rod must firmly grasp a spent casing for ejection, the gas from the expended round must fully cycle the slide to eject the spent casing and strip off a fresh cartridge from the magazine and jam it up the throat and into the chamber at the rear of the barrel. A failure – in any of these areas – will result in either a Failure to Feed or a Failure to Eject.

Failure to Feed: The overwhelming cause of a “Failure to Feed” is that the magazine is not fully seated into the magazine well contained in the grip of the weapon. The “Slap” portion of the “Slap, Rack, Shoot” clearing drill will resolve this issue. Next is a chamber throat that is full of GSR. This varies from weapon to weapon but if you notice that the magazine is fully seated and the slide cycles fully, yet your next round does not fully seat in the chamber and requires a tap on the rear of the slide to put your weapon back in battery – it’s a good bet a bit of scrubbing on the throat that feeds the chamber will resolve your problems.

Failure to Eject: Once a round has been fired the gas generated blows the slide reward, the ejector rod grasps the rear of the casing, yanks it from the chamber and throws it out the ejection port. Should this fail to happen one of two failures occur. The empty casing remains firmly planted in the chamber of the barrel or the casing is partially ejected through the ejection port sticking out like a “stovepipe”.

If the result is a stuck casing in the chamber, when the slide cycles forward again it will strip a new round off the top of the magazine and attempt to load it into the chamber. This malfunction is called a “Double Feed” and is the ONLY malfunction that can not be cured by the “Slap, Rack, Shoot” clearing drill. Your cure is to:

  • Lock the slide to the rear
  • Eject the magazine
  • Rack your slide three times
  • Insert a new magazine
  • Complete the “Slap, Rack, Shoot” drill

The “Stovepipe” failure is typically cleared with the “Slap, Rack, Shoot” drill with the hand that racks the slide sweeping the extended casing out of the ejection port. Multiple occurrences of this malfunction can be caused by a dirty weapon that results in the slide not being fully cycled. A little TLC will cure this problem. Or, it may be that your stance and grip are not quite firm enough and that part of the energy typically used to blow back the slide is expended in physically moving your dominant arm. This results in not enough energy being available to fully cycle the slide and a “stovepipe” occurs. This happens much more in today’s polymer composite weapons than those that are made total of steel. A firmer grip and a more rigid dominant arm will quickly cure this issue.

Revolvers and Semi-Automatic Pistols are mechanical devices. Failures happen. You will experience both “Failure to Feed” and “Failure to Eject” problems on the range and in your everyday carry. On the range – pay attention to why the failure occurred. FIX THE PROBLEM!!! As for everyday carry – if you are unfortunate enough to have a failure while fighting for your life – know the “Slap, Rack, Shoot” clearing drill. Inject problems on the range with dummy rounds loaded in your magazine or cylinder. Practice clearing these failures on each and every range visit. Carry secondary weapon systems – a knife, flashlight or tactical pen. Carry a BUG.

Because . . . . in the real world . . . . failure really is NOT an option.

Tuesday, October 2, 2012

Just the Basics – BLAMM!! BLAMM!! Click . . . . . . Cartridge Malfunctions


“A gentleman rarely needs a pistol, but when he does he needs it very very badly.”
–Winston Churchill

And . . . . it NEEDs to go BLAMM!!

A while back I spent a number of posts going through what, exactly, makes a firearm go BLAMM!!!! We covered everything from the development of gunpowder to the actual culprit – the shooters finger!

There are, however, three different categories of malfunction that I want to chat about – Cartridge Malfunctions, Feeding and Extraction Malfunctions and Weapons Malfunctions. This first post will cover my thoughts about malfunctions in general – then focus specifically on Cartridge Malfunctions. I’ll cover the remaining two – Feeding and Extraction Malfunctions and Weapons Malfunctions in succeeding posts.

I confess to being an active voyeur of my fellow man. I love to people watch – restaurants, airports, movie theaters, shopping malls – I love to people watch. And, of course, on the shooting range. You see all kinds of folks (BTW, I realize folks watch ME as well and could easily point a finger and say “Will ya look at THAT guy!!). There’s the “expert” with his/her tricked out everything, carefully laying out his hardware on the shooting bench.

There’s the newbie doing their best just to “fit in” and not look silly.

There’s the parent coaching the child, the husband coaching the wife, the mom coaching the daughter . . .

There’s the “instructor” helping anyone who will listen (honestly, I gotta watch myself on this particular one!)

In other words, a pretty good sampling of the human race shows up on a shooting range. Most are there to “work” on something – sighting in a rifle, slug gun, new pistol. They are there to “practice” – but not really sure just what it is that they should practice. And yet, they all share one common expectation . . . . that when they press the trigger – their firearm should go BLAMM!!!!, that does not always happen. The following process usually occurs in one fashion or another . . . .

  • Shooter looks at their weapon in disbelief!!
  • Scratches their head, racks a round or pulls a trigger again . . .
  • Hopes that it goes BLAMM!!!!
  • If it doesn’t or if something becomes “jammed” (said with a knowledgeable tone in their voice) perhaps “Fred” is called over, a confab is held, solutions reviewed and tried, the firearm is cleared and shooting resumes.

This hesitation, this “disbelief”, this calling in the “expert” fosters and develops a very bad habit – a switch in focus from the threat meaning to send you home in a Ziploc to “what the hell is wrong with my gun?!?!?” This is BAD!!! Honestly, it doesn’t matter WHY your gun stopped, only that you need to make it go BLAMM!!!! as soon as possible.

Yet, before you can really understand why the “fixes” work, you need to understand the failures first. In this post, we will focus on the Cartridge Failures – what they are, what they mean and how they affect the operation of your weapon.

There are three primary failures and a fourth we will chat about a bit. They are the Misfire, the Hang Fire, the Squib Load and a fourth – Casing Failure.

Misfire: A misfire happens when a cartridge received a solid strike (note I said a SOLID strike – we’ll cover other types of strikes later on) on the primer or rim of the cartridge and . . . . . nothing! Not a BLAMM!!!!, not a whisper, not a peep . . . . nothing!

The standard response for this type of cartridge failure is to keep your weapon pointed in a safe direction, wait 30 seconds – then clear the round and re-engage the target. Obviously, in a defensive situation, you would clear the round immediately (or press the trigger again in the case of a revolver) and simply not wait the 30-seconds for the round to “cook off”. We will cover the words “clear the round” when we go through the methods to clear the most common malfunctions in a future post.

A misfire, after the primer or rim receives a solid strike from the hammer or firing pin, is virtually always due to a defective primer. While this happens with factory loaded ammunition, honestly it is fairly rare in center-fire ammunition – and “common” in the much cheaper .22 rim fire ammo.

[Proper disposal of misfires: Many ranges have “tubes” that the misfires are dropped into. Periodically either oil or saltwater is poured down the pipes and eventually the ammunition degrades. For a simple portable solution take a a 20 oz pop bottle, fill it about ½ full of water and add a healthy dose of salt to the bottle. Shake well until all the salt is dissolved. Carry this in your car or range bag. In the event of a misfire – drop the offending cartridge in the bottle. Over time the salt water degrades the ammunition. You can either store these bottles or after a year to two, find a safe spot to bury the contents.]

Hangfire: You press the trigger, the cartridge receives a solid strike on the primer or rim of the cartridge and . . . . . . .BLAMM!!!! There is a noticeable delay from the time the primer is struck and the weapon goes BLAMM!!!! A failure of this type is usually due to a defective primer or defective powder. It is much more common in reloaded ammunition and in the black powder community. If you have a box of factory loaded ammo and experience a number of these at the beginning of the box, I would suggest you stop using the box and return it to the retailer. I suspect they will replace it at no cost to you in the vast majority of cases.

Squib Load: A squib is a small firework that burns with a hissing sound before exploding. When the cartridge receives a solid strike on the primer or the rim of the cartridge a loud hissing noise is heard that is either followed by a muted or non-existent BLAMM!!!!. The worst-case result of a squib load is that the bullet (or shotgun wad) is left part way down the barrel. In the event the shooter fires another round without clearing the bullet or wad and insuring that the barrel is clear – a catastrophic failure of the barrel nearly always happens. This falls under my continuing mantra on the range and in the field of keeping your head in the game. If something “funny” happens – be aware enough to KNOW it happened and be clear on what it takes to clear the cartridge malfunction.

In the case of a squib load, you will need to empty your weapon, take a rod and insure the barrel is clear from muzzle to chamber. Failure to do this could lead to a very bad day when the next round is fired.

Case Failure: When the cartridge receives a solid strike on the primer or the rim of the cartridge the casing experiences a catastrophic failure. This can look like the casing splitting, the primer being blown out, the rear of the casing separating, or a hole being blown in the side of the casing. These types of failures seldom occur in factory loaded ammunition. However, when a spent casing is cleaned and reloaded multiple times they become fatigued and will eventually fail. If you do reload, carefully examine each casing prior to inserting the primer and assembling the cartridge. If it “looks funny” – pitch it, the damage a Case Failure can cause is simply not the risk or the savings a reloaded round offers.

Cartridges are a mixture of mechanical pieces and chemical elements that depend of a specific chain of events to successfully go BLAMM!!!! As in all things, “shit happens” – pay attention, keep your head in the game, expect to have failures and know how to clear them.

Just because you press the trigger . . . . there is absolutely NO GUARANTEE that it will go . . . .

BLAMM!!!!