So I’m chatting with Ernie, a fellow trainer and the owner of a well-known gun shop in my area. I’m asking him if he’d had any cancelations in the CFS Carbine course he had scheduled the second week in June with Rob Pincus. He hadn’t but he asked . . . “Did you sign up for the course on the 6th, I’m sure there’s room.” I replied I didn’t even know he’d scheduled another class so he tapped away on his computer, confirmed that there was still room . . . with one less seat once I returned home and plopped down my credit card for the online registration. Cool! And . . . crap!
I never take coursework without taking a full set of backup gear along. The old “two is one, one is none” routine. I needed another carbine. Over the winter I’d picked up a Bushmaster upper, a DPMS lower kit to go with a lower I had tucked away in the safe. My plan was to find time to build it to be ready to go in the spring. But, since the CFS course had filled within days, and I “knew” I didn’t have a seat . . . I dragged my feet. Now, I had a seat but no second carbine and just no time to build it. Heavy sigh.
So, back to my local gun guy who I’d bought all the parts from. He had a nice Bushmaster on the wall so I asked him to take what I had in on trade – make if fair to him – and I’d be in after lunch the following day. A funny thing happened over the previous evening. It seemed as though the “shoemaker’s elves” had shown up and assembled my parts into a brand new carbine. Cool. I’d added a quad rail and a set of MAGPUL flip-up backup sights. I was ready to roll! All that was left was a trip to the range to zero it in.
I’ve made it no secret that I’m well within the age of “old fartdom” and have grown up with the 25 Yard AR target to zero in my carbine. In fact I did a post on that a quite some time back. However, keep in mind that this is carbine to be used for personal defense. That would imply that the vast majority of shots would more than likely be done within 50 yards or less. So, if I zeroed it for 50 yards . . . and paid attention to the ballistics chart . . . I’d probably be covered for everything from 50 to 200 yards.
In fact, the work had already been done for me by Frank Proctor of “The Way of the Gun”. He had come up with a method to zero an AR at both 50 yards and 200 yards . . . with a target placed just 10 yards away. COOL!! Take some time – follow the link – watch the video. I suspect you’ll find as I did, it’s quicker, dead on and holds for virtually all distances you’ll likely need for personal defense or most competitive shooting.
As with everything, the “tale of the tape” provides quick proof of concept . . . or throws the process on the ash heap. So off to the range I went with the 10 Yard target as well as a 50 yard target and a standard 100 yard target for good measure.
Here’s what my backup carbine looks like. As you can see, it’s nothing fancy. I’m just using the iron sights today – I’m not going to pull my Eotech from my primary unless I have a solid weapon failure and need to go to the backup. So, all targets shown will be iron sights only.
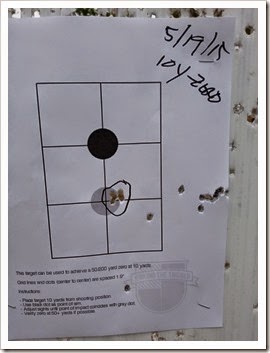
I set up a target at 10 yards, load 3 rounds in a magazine and send them down range. Elevation is spot on . . . Windage is far right. After a few more groups of three, and cranking the rear sight all the frickin’ way to the left, I had an acceptable group shown in the circle. (It turns out this is fairly common with the common problem being the front post being canted. I’ll work on it before the class.)
The process is interesting. Your POA is the dark circle. Your POI that you adjust for is the grey circle 1.9” below the dark circle. Ballistics of a 55gr .223 bullet. And, at 10 yards I could see the POI clearly without a spotting scope or binoculars. Very nice!
Next is a 3 round verification group at 50 yards. So off I go, hang the target and send 3 rounds down range. With very happy results – 1.5”-ish size group well centered. I’ll take it. I follow that with another 15 rounds to see if everything is holding. The result is also satisfying holding a 4.25” x 2” group. Again, I’ll take it. Off to 100 Yards.
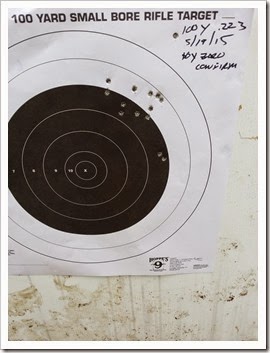
Remember, with a 50 Yard zero, you will see a couple inch rise at 100 yards followed by a return to zero at 200 yards. We do not have a 200 yard range so I’ll be content with my 100 yard result. With a magazine loaded with 15 rounds I begin a slow fire doing my best to be purposeful and deliberate with each of the 15 rounds. Again, the results are satisfying. The group is a bit high – as I expected. And, it is still a bit right but considering I’d run the rear sight all the way to the left, not surprised I’m a bit right of center. I have 12 in a nice fist sized group, 2 a bit low and 1 flyer . . . again I’ll take it.
Bottom line? I found this zero method to be very efficient and very effective. I suspect it will become by go-to process from now on.
Give it a try! Many thanks to Frank Proctor for all his work and his willingness to share this process with all of us . . . it’s a winner!


That's well thought out, and I'll have to try it the next time I'm at the range! Thanks, and thanks for the link!!!
ReplyDeleteThat's well thought out, and I'll have to try it the next time I'm at the range! Thanks, and thanks for the link!!!
ReplyDeleteGreat link, thanks.
ReplyDelete